Site tokens and largess don't have to be complicated! Here's a few quick and easy ideas that have met with success.
| Photo
|
Description
|
How-To
|

|
Salt Jars
|
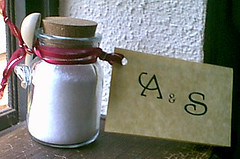
This couldn't be easier. Jars like this one are available at many craft stores. I purchased new corks, just to ensure they were sanitary, and poured in a nice Sea Salt. The gift was finished with a simple card with a nice phrase inside. In this case, "As salt adds flavor to a meal shared among friends, so also does your service add to the rich experience of The Dream we share. Thank You!" The front of the card bore the initials of the Crown at the time (Alaric & Sibri). I printed the saying on some nice parchment paper, matted it with black, and inset it into another printed card. A ribbon tied it to the jar. Time per jar: 15 minutes.
|

|
Pearls
|
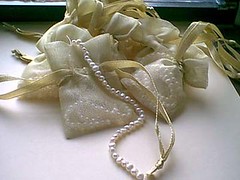
Step 1: Go to local Gem Faire or Bead Show. Step 2: Purchase strands of freshwater pearls ($2.00-$3.00 each). Step 3: Put pearls in small organza bags. Done. Time per gift: Depends on how focused you cay stay at the bead show...
|

|
Prayer Beads / Rosaries
|
Needed: 30 beads, plus 3 extra large/fancy beads, embroidery silk, tassel (made or purchased). String 10 beads, add a fancy one ("gaud"), string 10 more, add a gaud, string 10 more... run both ends through another gaud, and add a tassel.
|

|
Salt Soak
|
There are a gazillion recipes on the internet for salt soak. This one was simple: Bicarbonate of Soda, Epsom Salt, and a manly sandalwood oil for fragrance. Mix in a big metal bowl, then scoop into mason jars and top with a piece of fabric with a Black Star glued on top. Add a card that lists ingredients and instructions.
|

|
Ansteorran "Favor" Pins
|
Supplies:
- Wide yellow grosgrain ribbon
- Narrow black grosgrain ribbon
- Black leather for Ansteorran stars : Needs to have some body to it, so that it holds its shape, and a smooth front and back so it doesn't scatter leather shreds everywhere.
- Pin backs
Supply Estimate:
I used 10 yards of each color ribbon, and about 1 1/2 square feet of a good quality black leather to make thirty of these tokens. For speed, I made these in 'assembly line' style - I cut all the yellow ribbons, cut all the black ribbons, glued all the gold, then the black, then assembled.
Directions:
Take a length of 1" wide golden yellow grosgrain ribbon that is between 11" and 12" long and cut the ends at a slant to prevent fraying.
Take another length of black grosgrain ribbon: I used 1/4". You can use any width up to 3/4" wide. I highly recommend a thin ribbon so the star doesn't get "lost" against the black background. It needs to be at least 1" shorter than the yellow ribbon, up to 2" shorter.
Use a template to cut out a nice, even Ansteorran Star (5 major points, 5 minor points). The star should be no bigger than 2" across. The one I use is 1 and 14/16ths wide.
Take the yellow ribbon and cross the right side over the left, forming a loop at one end. Use a hot glue gun to glue these together at the point they cross one another. Use the eraser end of a pencil or other object to press the ribbons together. The heat of the glue will transfer through the ribbon in an instant. I have gotten more blisters on my fingertips than I care to count from hot glue.
Use the same process with the black ribbon, and then use another drop of glue to attach the black ribbon to the yellow ribbon. More glue, then drop the leather star on top, sealing well.
Add a pin to the back, and you're done!
Extra Touches:
- Use a gold Sharpie pen or other gold ink pens to trace around the edges of the star.
- Use a grosgrain ribbon with a stripe of the other color in it (gold with black, black with gold).
|

|
Quote Scrolls
|
OK, this one was a bit labor intensive, but it's worth it.
Materials:
- Ink-Jet/Color Laser Jet friendly Parchment Paper: I used the Southworth Brand, in Gold
- 1/8" wooden dowels
- Wooden beads with holes all the way through
- Sandpaper
- Metallic spray paint
Directions:
Find a quote that is applicable to your event. As I was making these scrolls for Crown Tournament, I wanted something that would speak about the qualities of leadership, to tie in with the event's purpose of choosing the next King and Queen. The greatest challenge of this step is finding something that the young adults (12+) that receive it can enjoy, that won't completely befuddle and be beyond the understanding of the younger children. The quote I used was: "The challenge of leadership is to be strong but not rude; be kind, but not weak; be bold, but not bully; be thoughtful, but not lazy; be humble, but not timid; be proud, but not arrogant; have humor, but without folly."
Find a decorative capital for the first letter of your quote. I didn't have any on hand that I liked for this specific project, so I made my own using Photoshop.
Using your word processing program of choice, lay out the quote and decorative cap, using a nice font. (I used Gaheris from the Scriptorium). I placed 4 to a page in landscape layout. This gave me a bit of extra room on the top and bottom. Print your pages on a good quality paper.
Next, trim the quotes into individual scrolls using scissors or a paper trimmer.
For the ends of the scroll, I cut lengths of wooden dowel that was 3/4" longer than the width of my cut and trimmed scrolls.
I sanded the ends until smooth, then spray-painted them (I used "Odds N Ends Fast Dry Enamel" by Plasti-Kote, in "Gold Leaf"). I found that putting them in a cut-down paper grocery bag with the beads, and then *liberally* spraying them with the spray paint, while rolling the bag around, gave a nice, even coat. Once dry, add a second layer for a nice even coat.
Once the beads and dowels were dry and evenly golden, I used craft glue to put a bead on either end of the dowels and let them dry overnight.
When the scroll-rods were dry, I used more craft glue to attach the scrolls. Using an unpainted piece of dowel, I rolled up the scroll onto the dowel, about 1". This created a curl in the paper, that would make it easier for the glued piece to stay on. I removed the rolling dowel, unrolled the paper enough that I could put on the glue, then slid in the painted scroll-rod. It's important to tightly wrap the paper onto the scroll-rod.
Each scroll was allowed to dry once more, then I rolled each side up to the midpoint, and tied it with metallic gold embroidery floss.
|

|
Belt Favor
|
Materials:
- Black Grosgrain ribbon, 1 1/2" wide
- Red Grosgrain ribbon, 1" wide
- Latigo or other strong leather to take a stamp
- Black Leather Dye
Directions:
The ribbon half of this project was extremely simple and fast to make. I took lengths of Black ribbon approximately 11" to 12" long, and lengths of red ribbon, 2" shorter. I laid the red on top of the black, and folded them in half, making a loop on the top. I sewed a seam about 3" down from the top of the loop, creating a place the children could put the favor on their belt. I tapered the ends of both ribbons into points.
For the ornament, I used a celtic knotwork leather stamp, and stamped out 30 impressions. (Through the kindness of Sir Balvin, I recently learned that if you wet down the leather and let it sit overnight in the fridge, it takes the pattern much better! Knowing that would have saved me a lot of discards.) Using sharp cutting shears made for leather, I cut out each circle, then dyed it black. After the circles dried, I used hot glue to attach them to the ribbon, over where I had sewn to hide the seam.
This creates a neat, kind of Germanic looking token that youth can wear on their belt like the grownups do. I was trying to replicate Northkeep's colors, but didn't realize that white and red would be a better choice.
|
Things Not To Do:
Please, learn from my disastrous failures!
Rule 1: Thou Shalt Not Undertake a Site Token Project That Takes More Than 30 Minutes Per Item. I tried making beaded tassels one time, figuring I had a gazillion beads. Yeah. No.
Rule 2: Thou Shalt Not Use Sculpy. Yes, I know, there are some folks who have fabulous success with it. But it's evil. It smells funny (and makes your oven and house smell funny) and it tends to break, no matter how carefully you heat treat it.
I hope this is of help, and inspires you with some ideas for largess or site tokens!
- Zubeydah 22:27, 12 September 2012 (PDT)


